

If you are not familiar with the Microsoft surface just have a look here.
Before starting the development we have to set up the environment.The prerequisites include the Vista with SP1 and DirectX sdk.You need to have a good graphics card and monitor which has enough resolution too.Around 1280 × 960 or widescreen 1440 x 900.Surface simulator has a resolution of 1024x768.
Once you install these softwares including surface sdk start the simulator.This is must if you need to see the output in the simulator.If you are running a surface program without simulator running it will show like a normal application.You wont get contacts and tag recognition.Working with simulator is another big topic and will be writing a separate post later.
Here is the screen shot of the simulator with small descriptions about the buttons.

- Contact selector : Used to select single object or multiple based on an area.
- Finger : Simulates a normal finger touch in the actual surface.We can do operations such as drag ,resize,slide etc
- Resizable blob : Represents big objects in real world such as a glass a hand etc...
- Byte tag and value : A tag value representation.The size of this tag is 8 bits.To place the tag click on the tag image set value and place it in the screen.The underlying program can then recognize this tag and its value.
- Identity tag its series and value : Same as byte tag.But the size is huge.
- Clear contacts : To clear all the contacts in the surface.
- Hide contacts : Hides all contacts.
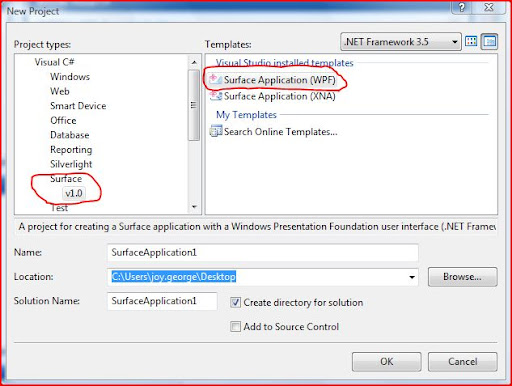
Now its time to start our favorite Visual Studio 2008.When you select new project you can see a new category Surface and inside that there are 2 templates.One is Surface Application (WPF) and Surface Application (XNA).As names implies they are for wpf and xna respectively.Click on WPF application in which we are interested
The in built surface template contains a SurfaceWindow1.xaml and .cs derived from SurfaceWindow which is the replacement for Window in normal WPF application.The resources folder contains some images which are icons and background of the SurfaceWindow.
SurfaceApplication1.xml contains the configuration of the application or metadata which helps the surface to identify the same.
Running surface application in simulator
As said earlier when we run the application from visual studio while the simulator is running in background,the application will get loaded in the simulator.Otherwise it will run as normal application.
Hit F5 in Visual Studio to start running and see the application in simulator.Its empty now with a grey background.
Adding controls into Surface WPF application
You can add controls such as button,textbox etc to the surface application just like ordinary wpf application.You can write code behinds, style them ,template them as you want.But here keep in mind that those controls should be from Surface library.That means Button will be now SurfaceButton,TextBox becomes SurfaceTextBox etc…Explore the Microsoft.Surface.Presentation.Controls namespace in Object browser to get the full list of surface enabled controls.
This gives a basic insight to the surface programming.But yet we haven’t used any of the special features in surface such as object recognition.The next post will be discussing tag identification and processing.

Since Surface simulator only has a resolution of 1024x768, why is it refuse to run on 1280x800 (my laptop)? Any workaround?
ReplyDeleteYou can run the Surfaceshell directly but you do not get the tool bar to switch between inputs
ReplyDeleteI want to load some images on the screen. I will keep some images and discard the rest. Then I want to write some text on some images by using key board, and those images can be saved with the text.
ReplyDeleteHow can I do it by C#/C++ in Surface Environment or Windows 7 multi touch environment?
Appreciation for nice Updates, I found something new and folks can get useful info about BEST ONLINE TRAINING
ReplyDelete