Showing posts with label Interactions. Show all posts

Friday, May 15, 2009

Magic transparent color glass using Interactions and OpacityMask

This is continuation of my previous post and this requires some knowledge about OpacityMask and the new Interactions mechanism introduced by the Blend team.

Prerequisites
Writing custom TriggerAction using Interaction to enhance MVVM
Understanding OpacityMask and its usage

What is this transparent color glass
Simply a Glass which shows a black and white image in color.The application here contains a black and white image along with a elliptical glass on it.We can see the same image in color through the glass and the glass is moving with mouse.

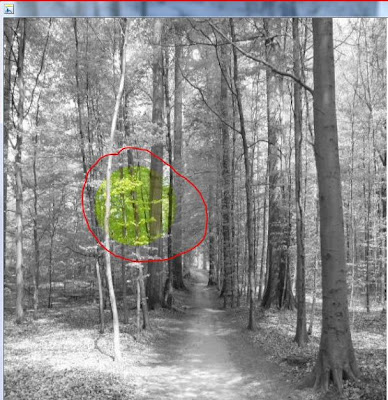
Basic idea of creating transparent glass
Of course there are 2 images one is color and another is black and white image of the same.In the application basically there are 3 layers inside a Canvas.One layer is again a Canvas and rest are Images.Bindings are used to make sure that all are in same size.

The canvas is at bottom ,with an ellipse inside.The second layer is the black and white image.At the top we have placed the actual color image and its opacity mask is set to make it viewable only through an elliptical portion.
The parent canvas is enabled with FollowMouseAction.It is a trigger action which enables the elements in Canvas to follow the mouse.The FollowMouseAction is bound to the MouseMove trigger.Hence it updates it’s position on mouse move.
We have to create a VisualBrush of the Canvas which is at the bottom layer to apply as OpacityMask of top layer image.Keep this as Resource.Set Stretch property of VisualBrush to None.Then set the OpacityMask of the top image to this resource.

Yes its done.Now run the project and see the glass in action.
Below are the step by step instructions to create this application.Later I will be writing about how to create color glass using Expression Blend 3

Steps

  1. Create a WPF application.
  2. Add 2 photos into application.One is the original which is in color and another is ,black and white version of the same.
  3. Add a Canvas to the Grid in Window and name it as ‘rootcanvas’ .Set its Height and Width.
  4. Add another Canvas in to rootcanvas and name it as ‘childcanvas’.Bind it’s Width and height to ActualHeight and ActualWidth of rootcanvas 
  5. Set the background property of childcanvas to any color with alpha value of 00.Eg :#00ffffff
  6. In the child canvas add an Ellipse named ‘ellipse’.Set it’s color to Red.Set Height and Width.
  7. Add 2 images into parentcanvas.Bind Width and Height in to ActualWidth and ActualHeight of rootcanvas.
  8. Set black and white photo to the first image(middle layer)and color photo to the top most layer.
  9. Create a Visual brush of childcanvas and store as Resource named ‘CanvasVisualBrush’.Set its stretch to None.
  10. Apply ‘CanvasVisualBrush’ as OpacityMask of Image which is in top layer.(which has the color photo)
  11. Add Reference to the dll MyActionsLibrary.(See my previous post to get MyActionsLibrary dll)
  12. Add FollowMouseBehavior into the parentcanvas.Set it’s Event to MouseMove.
  13. Set the Element property of FollowMouseAction to ‘ellipse’.
  14. Run and enjoy.

Try these steps your self.In the worst case (If you can’t do it by yourself) see the sample here.Let me know if you got struck somewhere in steps.

Monday, May 11, 2009

Writing custom TriggerAction using Interaction to enhance MVVM

The Blend team has introduced a new concept called Interactions for both WPF and Silverlight.According to my understanding it is a method to interact with the xaml elements without writing code behind.Expression Blend is developed using the new architectural concept MVVM and I think they mainly introduced it to enhance MVVM.

There are 2 methods to implement this interaction.One is Behaviors and other is Triggers.Behaviors will be covered in a separate post.This post is related with Triggers, Actions and creation of  a custom Action called FollowMouse.

I have already wrote a post about Microsoft.Expression.Interactivity.dll which tells about creating a custom trigger named RoutedEventTrigger which fires on the associated RoutedEvent.In that post, the intention was to invoke a command upon attached events like Mouse.MouseDown,Mouse.MouseMove,Contacts.ContactDown etc…That is too, very much useful to achieve a perfect MVVM architecture.

In the perfect MVVM world there should be no code behind for xaml files.But when we implement in the real world ,sometimes we will be forced to write code behind to implement some special cases such as MessageBox.Show.Using the Microsoft.Expression.Interactivity.dll we can write actions which display the messagebox.

More links about the behaviors and interactions are below

http://electricbeach.org/?p=147
http://blog.kirupa.com/?p=341

What are these new Interactions

As I told earlier this is a method to interact without writing code behind.The code will be encapsulated in the action classes.See the example below which shows  a MessageBox using only xaml upon a MouseDown.

<Grid Background="Red">
<i:Interaction.Triggers>
<i:EventTrigger EventName="MouseDown">
<myactions:ShowMessageBoxAction MessageBoxText="Mouse down" />
</i:EventTrigger>
</i:Interaction.Triggers>
</Grid>


Hope the above code is clear.It tells to show a MessageBox upon MouseDown in the Grid.We know that it is not possible or don’t have default support in xaml to show the message itself.Then where is the C# code to show the message.The answer is simple.It is in the ShowMessageBoxAction class.That class has a MessageBoxText property which is displayed on invoking that action.


To implement interaction it is using attached properties.Interaction.Triggers is an attached property of type TriggerCollection.We can add as many triggers we want.The condition is that all those triggers should be derived from TriggerBase.Here I have used built in EventTrigger and a custom action ShowMessageBoxAction.


Developing our own custom Trigger Action : FollowMouseAction


Writing a custom trigger action is very simple.There should be a reference to the Microsoft.Expression.Interactivity.dll in our project.That dll is from Expression Blend 3 so it should be blend installed in your system to refer.Path is <Install drive>:\Program Files\Microsoft Expression\Blend 3 Preview\Libraries\WPF.Or you can download from any blogs.


The action class ,we need to derive from the base class named Microsoft.Expression.Interactivity.TargetedTriggerAction<T> this has a generic parameter which is the type of the target.


Here we are going to implement a FollowMouseAction.The purpose of this is to create an action which follows mouse and updates it’s position according to that.For that we have to associate trigger to a Canvas.Canvas is the simple panel in which children can be easily placed by specifying Left and Top.So at the time of inheriting class we have to specify the Canvas as it’s action type.


One more thing we need is which child of canvas is following the mouse.So we have to add one more property called Element which is of type FrameworkElement.On action invocation we will be setting the Canvas.Left and Canvas.Top properties of Element according to the mouse position.


public class FollowMouseAction : Microsoft.Expression.Interactivity.TargetedTriggerAction<Canvas>
{
public FrameworkElement Element
{
get { return (FrameworkElement)GetValue(ElementProperty); }
set { SetValue(ElementProperty, value); }
}

// Using a DependencyProperty as the backing store for element. This enables animation, styling, binding, etc...
public static readonly DependencyProperty ElementProperty =
DependencyProperty.Register("Element", typeof(FrameworkElement), typeof(FollowMouseAction), new UIPropertyMetadata(null));

protected override void Invoke(object parameter)
{
Point pt = Mouse.GetPosition(this.Target);
if (Element != null)
{
Element.SetValue(Canvas.LeftProperty, pt.X);
Element.SetValue(Canvas.TopProperty, pt.Y);
}
}
}

Using the FollowMouseAction in xaml.


<Grid>
<Canvas Width="300" Height="300" Background="Red">
<Ellipse Width="50"
Height="50"
Fill="Green"
x:Name="ele">
</Ellipse>
<i:Interaction.Triggers>
<i:EventTrigger EventName="MouseDown">
<myactions:FollowMouseAction Element="{Binding ElementName=ele}" />
</i:EventTrigger>
</i:Interaction.Triggers>
</Canvas>
</Grid>


The above code updates mouse position when we click on the mouse.How can we make it movable accoring mouse ?Easy just change the event name to “MouseMove”.See below if you are still not clear.


<Grid>
<Canvas Width="300" Height="300" Background="Red">
<Ellipse Width="50"
Height="50"
Fill="Green"
x:Name="ele">
</Ellipse>
<i:Interaction.Triggers>
<i:EventTrigger EventName="MouseMove">
<myactions:FollowMouseAction Element="{Binding ElementName=ele}" />
</i:EventTrigger>
</i:Interaction.Triggers>
</Canvas>
</Grid>


NB: Please don’t confuse these Triggers and Actions with the standard triggers and actions available in WPF.They are entirely different where the Triggers mentioned here comes from the namespace Microsoft.Expression.Interactivity and the standard WPF Triggers comes from System.Windows


The above is applicable to Silverlight too.The only change you have to to do is change the reference to the interactivity dll located at <install drive>:\Program Files\Microsoft Expression\Blend 3 Preview\Libraries\Silverlight.If you need more and more details please see this great article from my colleague Laurent Bugnion 


Sample can be downloaded from here.